Your Guide to Amazon Storefronts

Amazon has come a long way from its standard listings. Where brands were once confined to standard bullet points and a short product description, Amazon has already introduced new ways to share your brand’s story with resources like EBC & A+ Content. Now comes Amazon’s newest addition to the game: the Storefront.

In this guide, we give you all the information you need to understand and create your own Store, including advantages, limitations, and a step-by-step tutorial with images.

Need further help? Avail of our Amazon Storefront consulting service below.

What is the Amazon Storefront and where can I access it?

Amazon’s Storefront is the newest way for companies to add flare to their listings and expand their brand story. It’s a free, intuitive service made up of pre-formatted, customizable layouts for any Amazon 1P or 3P merchant. Amazon Stores offer merchants the option to have an online store dedicated to their Amazon listings only. They come as a replacement for Amazon Pages and offer a lot more content, options and flexibility. For example, merchants can now have dedicated pages for each of their product lines, use the advantage of HD Video and most importanlty, differentiate their brand from their competition.

Stores offer another advantage, and it is that they come with their own dedicated links which can be accessed by anyone. This means you can now include Amazon Store links to your Amazon marketing campaigns, in online campaigns outside Amazon (Google, e-mail) or share them on your brand’s social media. What’s even better, one can share links directly leading to a dedicated page within the store. So if we see the example from below, the Amazon Basics brand can use a link which leads directly to their Audio line in their online campaigns. This makes Amazon Stores a very powerful marketing and conversion tool for existing and prospective Amazon merchants.

Amazon Storefront Course


Amazon’s Stores also have a responsive design, which means they can be accessed and displayed correctly on any device. There are a few details which a creator has to pay attention to ensure optimal display on mobile devices. Read below in this article to find out more.

Where can I access it?

Amazon Stores can be accessed by both first and third party vendors and sellers. Vendors can access their Stores via Amazon Marketing Services. The Stores link is at the top of the homepage (main navigation bar), once one logs in Amazon Marketing Services. 

Sellers can also access their Amazon Store in the main navigation bar at the top of the Seller Central homepage. Here sellers can access the Stores functionality is under the “Storefront” tab (link). Note that you need to register your brand(s) in the Amazon Brand Registry 2.0 first to be able to create your own store. Each brand you own can have its own separate Amazon Store.

Once you’ve published your store, users can access the live store by clicking on your brand by-line or via dedicated links. See further below in this article for more details.

Require Amazon Storefront help? See our Storefront consulting service below.

What’s inside an Amazon Store?


The Amazon Store builder has four sections:

1. The Page Manager is used to create, select, move and delete pages from the Amazon Store.
2. The Preview Window provides a live view of the current page. It can also be used to select a tile to edit in the Tile Manager.
3. The Tile Manager is used to add, edit, move and delete tiles from the Amazon Store.
4. The Status Bar provides the current moderation status of the Amazon Store and displays any error messages.

When it’s published and live, each Amazon Store page consists of a logo, hero image, navigation bar, a body/content, and a footer.

Amazon Storefront Course

Logo Image:

The Amazon stores feature the brand’s logo at the left of the header. There is an option to display or hide your logo, but we always recommend that you chose to display your logo. The logo image should be at least 400 px wide and tall and remember that it is constrained to a square format. In case you have a very horizontal or a very vertical logo, think about restyling it to conform to the square format. For example, you may want only to feature your initials.

Hero Image

Hero images appear at the top of each page of the Amazon Store, including the store homepage. They are feature images whose job is to introduce the page content below them. The store builder lets you customize the hero image for each separate page which makes it convenient to design hero images that explain the content, but also make the store more visually versatyle.

Navigation Bar

Each website has its own navigation bar, and this holds true for your Amazon Store as well. The bar is located right below the hero image. Amazon Stores let you decide how many pages and subpages your store will contain. Page making is very easy and straightforward. The [age and subpage names are automatically listed in the navigation bar immediately after you create them via the “Add Page” button. For more information on how to add store pages, read below in the “How to make a storefront” section.

Body/Content section

The body/content section contains the bulk of the store content. There are 8 different options for tiles including images, videos, product grids, text, individual product tiles, galleries, and lists of best sellers. Each tile comes in 4 different sizes and the tiles can have different functionalities as well. The Gallery tile, for example, enables you to display images in a carousel while the Best Selling Products tile displays your brand’s best selling products. Use the flexibility of the tile design to add content strategically. Maybe you want to highlight product features in detail or perhaps tell your brand story. The tiles system allows you to do all. The challenge is to take advantage of its features and make it work for you.

Amazon Storefront Course

Footer

The stores’ footer is displayed on every page and it is simply a social media section which allows you to share the particular page on Facebook, Twitter, and Pinterest. It is automatically generated and you don’t have the option to customize it.


Require Amazon Storefront help? See our Storefront consulting service below.

Advertising and Advantages of Amazon Store

Selling on Amazon has traditionally meant conforming to tight restrictions on customizing your brand’s product listings with their standard one size fits all layout. But that’s been changing.

According to Amazon, “the in-store experience is key for brands to drive shopper loyalty and increase sales.”

Here are a few of our best reasons to own an Amazon Store:

  • Increase the visibility of your brand: Your keywords are indexed by Google, gaining organic visibility and driving additional traffic to your site.

  • Grow your online retailing business: Seeing all your products in one place can help customers find other things you sell. On Stores, Amazon customers can share it with their network, helping brands expand their outreach even further.
  • Gain reputability: Elaborate your brand story where you once couldn’t. Stores are like a micro website inside Amazon that you can customize and personalize. Brands now have the opportunity to add features they’ve never been able to before on Amazon like slideshows, videos, and testimonials.

  • It costs nothing: Stores are a free, powerful tool to display your brand’s value and product selection while elaborating your brand story.
  • It’s a valuable marketing asset: Brands can choose to create an entire page dedicated to a single product, great for product launches.
  • You have your own micro website inside amazon where you can add slide shows, videos, and galleries. For sellers who can’t show videos on their listings, directing the shopper to their store can serve as a valuable tool to create an immersive virtual shopping experience.
  • Stores can be used as landing pages for Headline Ads: Instead of advertising a single product, brands can now direct consumers to their entire store collection.
Amazon Storefront Course

Advertising

Now that your store will have it’s own URL, you can share your page off Amazon on your social networks to create more traffic. Use built-in social features like social sharing buttons, paired with promotional advertisements with Headline Search Ads to drive store awareness and traffic.

Limitations:

Stores have lower conversion than customer URLs (for now).

Stores are still a new feature. As we have more time for research, and as more customers get used to them, there aren’t enough results to prove stores create higher conversion rates than the traditional brand page.

Require Amazon Storefront help? See our Storefront consulting service below.

Submission & Review Process

How to create a storefront step by step

For vendors, access your “storefront” through Amazon Marketing Services.

Sellers can also access their Amazon Store in the main navigation bar at the top of the Seller Central homepage. 

Click the Edit Page button in your Storefront page.

You will enter the page builder whose elements we explained above.

We start by uploading a store/brand logo.

Remember that the logo should be at least 400px wide and 400px tall. Also, remember that the logo format is squared, so horizontal and vertical company logos might not look well once uploaded. Try restyling your logo to fit the square format.


Amazon Storefront Course

Create an attractive homepage

This is where you really need to take advantage of Amazon Stores’ tiles system, get creative and organize your content to fit your marketing needs.

Design a Hero Image wisely and let it introduce the whole store along with your logo. Hero images take up the whole width of the store and are layered on top with the store/brand logo on the left. The right side is reserved for the artwork. Amazon Stores lets you customize the header for each of the individual store pages, including the homepage. The recommended dimensions for hero images are 3000px x 600px. Always remember that the leftmost 900px  should not contain crucial information such as important text or other logos. The content placed there will be cropped and won’t be displayed properly on mobile devices.

There are 8 different options for tiles including images, videos, product grids, text, individual product tiles, galleries, and lists of best sellers.

Each title in the store builder comes in four different sizes and formats:

How you choose to design your homepage is your choice, though it is recommended that you showcase all of your key products and product lines from the start. This helps potential customers to navigate your Amazon Store by helping them get to the product they are interested faster. Though the navigation bar is functional, a simple link won’t always suffice to describe your products.

Create pages and construct your Navigation Bar.

When you add and name a page, you automatically populate your Navigation Bar.  The pages connected to the homepage (red line on your brand) will appear as main links on the navigation bar, whilst the ones connected to the other pages (red line not on homepage) will attach to them as subpages and will be displayed as drop-down links. 

Besides the page name and description, you can choose from one of the 3 pre-formatted tile page templates, or you can start with a blank page and do it yourself. As always, think strategically about how that particular page will benefit from a certain layout.


Amazon Storefront Course

Edit and delete Tiles

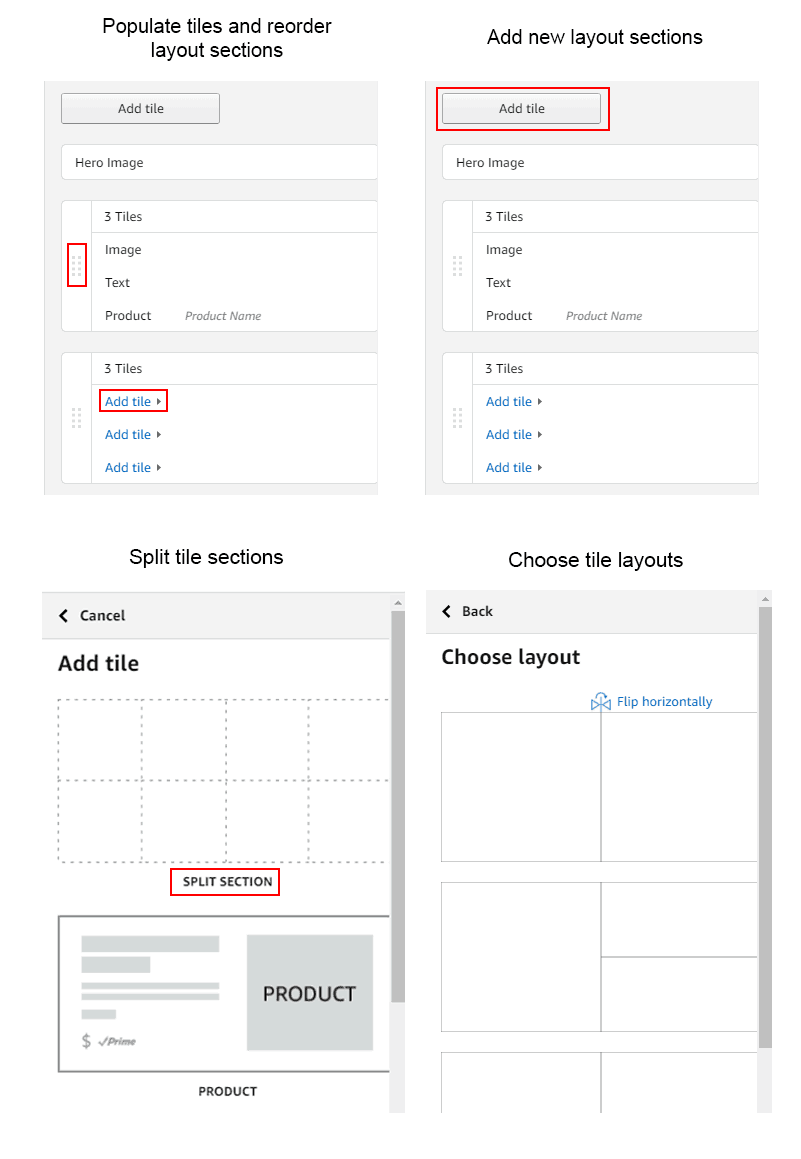
The Tile Manager (the rightmost section in the store builder) lets you edit, add and remove individual tiles and tile sections. You can add and edit tiles to the existing layout by simply clicking the tile in the Tile Manager or directly in the preview window. To add new tile layout sections you click the Add Tile button at the top of the Tile Manager. This button is especially useful if you chose the Blank template when creating a page. Every new tile layout section is added at the bottom of the preview window. The Tile Manager also lets you reorder layout sections up and down by holding and dragging the section’s sidebar, the one with the 8 gray squares. The process if very visual and easy to understand. With some practice, you can master it quickly.


Everything is intuitive except when it comes to deleting sections and tiles. To delete an already populated tile, you need to click on in in the Tile Manager and then click the delete link at the bottom. To delete a layout section, first, you have to click at the top of the section (where the tiles are numbered) and then click the delete link. Please see the image below.


Amazon Storefront Course

Publishing

Be sure to submit your Store only after you’ve determined your pages are error free and don’t break Amazon’s content policies. Approval can take up to 72 hours, and there’s no way to make modifications during this time.

Here is a checklist to go through before you submit your store.

  • Check if your content breaks Amazon’s guidelines
  • Go through each individual page. Read the copy, check each image and play every video.
  • Check for spelling and punctuation mistakes.
  • Check how your store performs on mobile by clicking “Preview: Mobile” at the top of the Preview Window.
  • Referencing your company as a seller or distributor, or providing company contact information.
  • Mention of competitor’s products or seller authorization such as “product only sold by authorized resellers.”
  • Pricing or promotion information such as “cheap, affordable, on-sale, etc.”
  • Information about shipping details such as “Free shipping”, “shipping timelines.”
  • Boastful comments such as “top-selling product,” “hottest item,” “#1 selling item.”
  • Time-sensitive product information: “on sale now” or “best new product of the year.”
  • Information about customer reviews from Amazon or any other site.
  • Adding editorial or third-party quotes from external sources such as magazines and television shows.
  • Any warranties or guarantees of any form, e.g., “satisfaction guarantee, money back, etc.”
  • Logos from brands or organizations other than your own or multiple brand logos in a single video view.
  • Web links or language attempting to redirect to other sites inside or outside of Amazon (including your other products).
  • Any mention of products being used for criminal activity.
  • Offensive content such as videos containing nudity, profanity, illegal activities.
  • Videos for which you don’t own the rights, leading to copyright infringement.

After your store is published you can come back and edit the content as many times as you want, just remember that it will take Amazon up to 72 hours to approve the changes.

Require Amazon Storefront help? See our Storefront consulting service below.

Amazon Storefront Consulting Service

Establish your brand content beach-head on Amazon, drive product discovery & track external campaigns with our Amazon Storefront (Stores) consulting service.

Our dedicated Amazon content team will develop or overhaul your Amazon Store / Storefront content in line with your brand guidelines – while maximizing product discovery.

We support all Amazon marketplace languages (except China).

    Your Name

    Your Email (required)

    Your Website (required)

    Message

    The form was sent successfully.
    We will get back to you shortly.